
Web开发-React-Redux与Vuex使用对比
一. 概述
React与Vue是我们熟悉的两大前端主流框架,来自官方的解释,Vue是一套用于构建用户界面的渐进式框架,React是一个用于构建用户界面的JavaScript库,两个框架都使用各自的语法,专注于用户UI界面的构建.那我们会有疑问,这两个框架都专注于UI界面的构建,但是随着JavaScript单页应用开发日趋复杂,我们如何进行更多数据的管理呢?比如网络请求的数据、缓存数据、本地生成尚未持久化到服务器的数据,UI状态数据,激活的路由,被选中的标签等等. 基于上面的疑问,两个框架都有各自的解决方案:React-Redux与Vuex.
二.使用
1.Redux
使用react-redux之前我们先来了解一下Redux。Redux是 JavaScript 状态容器,提供可预测化的状态管理,Redux由Flux演变而来,当然除了和React一起用外,还支持其它界面库,不过我们这里主要介绍它配合React进行使用.先来了解下它的几个核心概念:
(1) 核心概念
State: 所谓的state就是React组件所依赖的状态对象。你可以在里面定义任何组件所依赖的状态。比如一个简单的todo应用的state可能是这样
{
  todos: [{
    text: 'Eat food',
    completed: true
  }, {
    text: 'Exercise',
    completed: false
  }],
  visibilityFilter: 'SHOW_COMPLETED'
}
Action:action就是一个普通JavaScript对象,用来描述发生了什么.比如
{ type: 'ADD_TODO', text: 'Go to swimming pool' }
{ type: 'TOGGLE_TODO', index: 1 }
{ type: 'SET_VISIBILITY_FILTER', filter: 'SHOW_ALL' }
你可以把action理解为一个描述发生了什么的指示器。在实际应用中,我们会dispatch(action),通过派发action来达到修改state的目的。这样做的好处是可以清晰地知道应用中到底发生了什么。
Reducer:reducer的作用是用来初始化整个Store,并且串起state与action, 它是一个接收state和action并返回新state的函数.我们可以通过区分不通的action类型,来处理并返回不同的state.
const StoreAction = (state = defaultState,action) => {
    switch (action.type) {
        case HOME_ACTION_UPDATE_STATE:
            return {...state,...action.data};
        case ADD_ARTICLELIST_STATE:
            let newState = JSON.parse(JSON.stringify(state));/// 深拷贝
            newState.articleList = newState.articleList.concat(action.data);
            return newState;
        default:
            return state;
    }
}
(2) 使用原则
使用Redux进行数据管理时有三个原则需要注意
单一数据源
整个应用的state被储存在一棵object tree中,并且这个object tree只存在于唯一一个store中。State是只读的
唯一改变state的方法就是触发action,action是一个用于描述已发生事件的普通对象。使用纯函数来执行修改
我们通过reducer接收先前的state和action,并返回新的state,Reducer必须是一个纯函数,所谓的纯函数就是一个函数的返回结果只依赖于它的参数,并且在执行过程中没有副作用。
(3)React Redux
react-redux是Redux官方提供的React绑定库.他的使用也遵循上面的redux原则。
- 安装
npm install --save react-redux
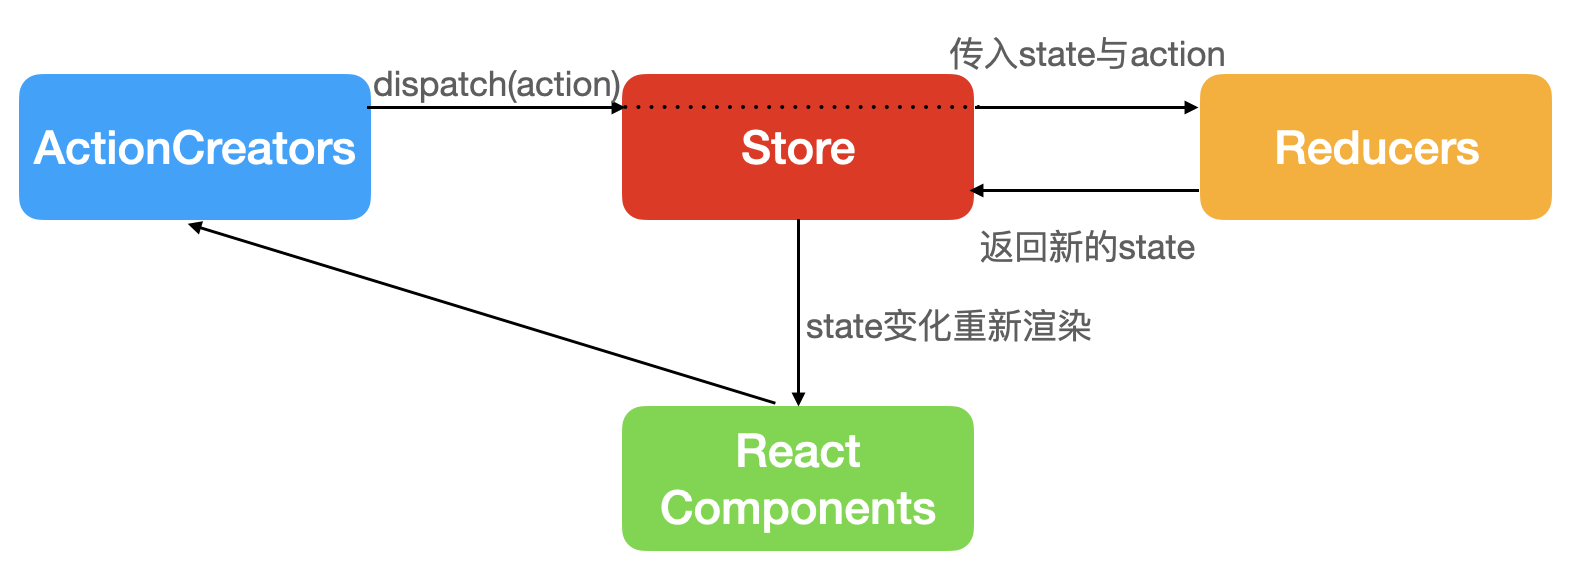
流程

通过上面的流程图可以很清晰的明确Redux的使用:React组件首先调用ActionCreators里事先定义好的方法,得到一个actoion,通过dispatch(action)达到派发action给Reducer的目的。Reducer通过接受的不同的action来对state数据进行处理,处理完成后,返回一个新的state,state变化后React组件进行重新渲染。使用
入口文件index.js
import React from 'react'
import { render } from 'react-dom'
import { Provider } from 'react-redux'
import { createStore } from 'redux'
import todoApp from './reducers'
import App from './components/App'

let store = createStore(todoApp)

render(
  <Provider store={store}>
    <App />
  </Provider>,
  document.getElementById('root')
)
创建store/reducer.js
import { ADD_TODO_LIST_VALUE } from "./actionTypes";

/// 初始化数据
const defaultState = {
    todos: [{
        text: 'Eat food',
        completed: true
      }, {
        text: 'Exercise',
        completed: false
      }],
      visibilityFilter: true,
}
/// Reducer 可以接受state,但是不能修改State !
export default (state = defaultState , action) => {
  switch (action.type) {
      case ADD_TODO_LIST_VALUE:
        const newState = JSON.parse(JSON.stringify(state));///将原来的state 做一次深拷贝
        newState.todos.push(action.value);
        return newState;
      default:
        return state;
  }
}
根据
reducer创建store/index.js,import { createStore,compose,applyMiddleware } from 'redux'; import reducer from './reducer'; const store = createStore(reducer); export default store;创建
actionCreatorsstore/actionCreators.jsimport { ADD_TODO_LIST_VALUE } from "./actionTypes" export const addItemListAction = (value) => ({ type:ADD_TODO_LIST_VALUE, value })创建
actionTypes专门用来存储action的type值export const ADD_TODO_LIST_VALUE = 'add_todo_list_value';React组件中使用
import React, { Component } from 'react';
import { addItemListAction } from '../pages/home/store/actionCreators';
import {connect} from 'react-redux';

class Customtodolist extends Component {
    render() {
        return (
            <div className='todo-list' onClick={()=>{this.props.addListItem()}}>
              <ul>
                  {
                    this.props.todos.map((item,index) =>
                      <li key={index}>{index}:{item}</li>
                    )
                  }
                </ul>
            </div>
        );
    }
}
const mapStateToProps = (state) => {
    return {
        todos: state.todos
    }
}

const mapDispatchToProps = (dispatch) => {
    return {
        addListItem: () => {
            const item = {text: 'Eat food',completed: true}
            const actionCreator = addItemListAction(item);
            dispatch(actionCreator);
        }
    }
}

export default connect(mapStateToProps, mapDispatchToProps)(Customtodolist);
我们通过
react-redux的connect方法,将mapStateToProps与mapDispatchToProps 方法与组件链接,然后直接在类组件中通过this.props.XXX的方式进行访问Store中的state.React hooks中使用/// hooks 中使用react-redux import { useSelector, useDispatch } from 'react-redux'; const Home = (props)=> { // hook 获取store state 方式 const storeCount = useSelector(state => state.home.count); // 获取actionCreator方法 const dispatch = useDispatch(); return ( <div className={style['home-content']}> <div className='home-content-detail'> StoreCount数据展示{storeCount} <div> {/* addStoreCount是在actionCreators中定义的方法 */} <button onClick={()=> {dispatch(addStoreCount(0))}}>点击storeCount+1</button> </div> </div> </div> ) }
redux-thunk的使用redux-thunk是redux的中间件.他的主要作用是可以使用异步派发action。例如我们要进行网络请求,那么可以在actionCreators里面异步派发action.安装与使用
npm install --save redux-thunk(1).在store/index.js 中添加引入
import thunk from "redux-thunk";/// redux-thunk 中间件 需要引入的(2). 使用
thunk初始化store/// 下面的代码是固定写法 /// redux-thunk 中间件 需要引入的 const composeEnhancers = typeof window === 'object' && window.__REDUX_DEVTOOLS_EXTENSION_COMPOSE__ ? window.__REDUX_DEVTOOLS_EXTENSION_COMPOSE__({ }) : compose; /// 中间件都需要用这个方法 const enhancer = composeEnhancers( applyMiddleware(thunk),/// redux-thunk 中间件 需要引入的 ); /// 创建 const store = createStore( reducer, enhancer//使用Redux-thunk 中间件 );(3).在
actionCreater.js中添加异步派发函数,注意:在获取到异步处理的结果后,我们任然需要调用actionCreater.js中的其他创建action方法,来对其进行dispatch.export const initListAction = (data) => ({ type:INIT_LIST_ACTION, data }) /// 将异步请求 放在 Action 中执行 export const getToList = () => { /// 这里返回一个函数,能获取到 dispatch 方法 这就是 redux-thunk 的作用,可以返回一个函数 return (dispatch) => { axios.get('/api/todolist').then((res) => { // alert(res.data); const data = res.data; const action = initListAction(data); dispatch(action); }).catch((error)=>{ console.log('网络请求错误了---thunk----》'); }) } }reducer的拆分与合并随着项目功能模块越来越多,如果只有一个
reducer来维护state,会使其变动越来越大,从而导致难以维护。combineReducer应运而生, 它将根reducer分拆成多个reducer,拆分之后的reducer都是相同的结构(state, action),并且每个函数独立负责管理该特定切片 state 的更新。多个拆分之后的reducer可以响应一个 action,在需要的情况下独立的更新他们自己的切片 state,最后组合成新的 state。使用
import { combineReducers } from 'redux';/// 将小的Reducer 合并成大的reducers
/// 需要拆分
import headerReducer from '../common/header/store/reducer'
import mainReducer from './mainReducer';
import {reducer as homeReducer} from '../pages/home/store';
import {reducer as loginReducer} from '../pages/login/store';

/// 进行 reducer的合并
const reducer = combineReducers({
    header:headerReducer,
    main:mainReducer,
    login:loginReducer,
    home:homeReducer,
})

export default reducer;
在
react组件中使用,要加上reducer名称,例如我们在Home组件中这样获取其stateconst mapStateToProps = (state, ownProps) => { return { showScroll: state.home.showScroll,//state后面添加reducer名称 } }
2.Vuex
Vuex是一个专为 Vue.js 应用程序开发的状态管理模式 + 库。它采用集中式存储管理应用的所有组件的状态,并以相应的规则保证状态以一种可预测的方式发生变化。它主要用来解决多个组件共享状态的问题。
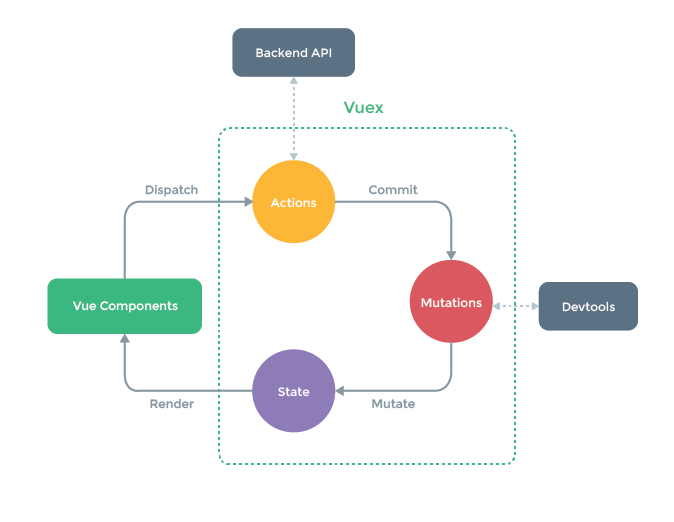
Vuex 跟 Redux的数据管理模式很相似,如果理解Redux,那么Vuex也很容易理解了,只不过Vuex 是专门为 Vue.js 设计的状态管理库,使用起来要更加方便。
(1) 核心概念
State: 就是组件所依赖的状态对象。我们可以在里面定义我们组件所依赖的数据。可以在Vue组件中通过this.$store.state.XXX获取state里面的数据.Getter:从store中的state中派生出一些状态,可以把他理解为是store的计算属性.const store = createStore({ state: { todos: [ { id: 1, text: '...', done: true }, { id: 2, text: '...', done: false } ] }, getters: { doneTodos: (state) => { return state.todos.filter(todo => todo.done) } } })例如我们定义了上面的store,在Vue组价中通过
store.getters.doneTodos访问它的getter.Mutation:更改 Vuex 的 store 中状态的唯一方法是提交 mutation,我们通过在mutation中定义方法来改变state里面的数据。const store = createStore({ state: { count: 1 }, mutations: { increment (state) { // 变更状态 state.count++ } } })在Vue组件中,我们通过
store.commit('increment'),来提交。需要注意的是,Mutation 必须是同步函数。在实际使用中我们一般使用常量替代 Mutation 事件类型。例如:export const INCREMENT_MUTATION = 'INCREMENT_MUTATION' const store = createStore({ state: { count: 1 }, mutations: { // 我们可以使用 ES2015 风格的计算属性命名功能来使用一个常量作为函数名 [INCREMENT_MUTATION] (state) { // 变更状态 state.count++ } } })Action:Action 类似于 Mutation,不同在于:- Action 提交的是 mutation,而不是直接变更状态。
- Action 可以包含任意异步操作。
const store = createStore({
  state: {
    count: 0
  },
  mutations: {
    increment (state) {
      state.count++
    }
  },
  actions: {
    incrementAsync ({ commit }) {
    setTimeout(() => {
      commit('increment')
    }, 1000)
   }
  }
})
在组件中我们通过
store.dispatch('incrementAsync')触发action。Module: 当我们的应用较大时,为了避免所有状态会集中到一个比较大的对象中,Vuex 允许我们将 store 分割成模块(module),你可以把它理解为Redux中的combineReducer的作用.const moduleA = { state: () => ({ ... }), mutations: { ... }, actions: { ... }, getters: { ... } } const moduleB = { state: () => ({ ... }), mutations: { ... }, actions: { ... } } const store = createStore({ modules: { a: moduleA, b: moduleB } })
在Vue组件中我们使用store.state.a, store.state.b 来分别获取两个模块的状态.
(2) 使用
安装
npm install vuex@next --save OR yarn add vuex@next --savemain.js中挂载storeimport { createApp } from 'vue'; import App from './App.vue'; import router from './router'; import store from './store'; createApp(App).use(store).use(router).mount('#app');创建
store/index.jsimport { createStore } from 'vuex'; import { ADD_ITEM_LIST, REDUCE_ITEM_LIST, CHANGE_ITEM_LIST_ASYNC } from './constants'; export default createStore({ state: { itemList: [ { text: 'Learn JavaScript', done: true }, { text: 'Learn Vue', done: false }, { text: 'Build something awesome', done: false }, ], }, getters: { doneItemList: (state) => state.itemList.filter((todo) => todo.done), }, mutations: { // 使用ES2015风格的计算属性命名功能 来使用一个常量作为函数名 [ADD_ITEM_LIST](state, item) { console.log('增加数据', item); state.itemList.push(item); }, [REDUCE_ITEM_LIST](state) { console.log('减少数据'); state.itemList.pop(); }, }, actions: { [CHANGE_ITEM_LIST_ASYNC]({ commit, state }, todoItem) { /// 模拟网络请求 setTimeout(() => { commit(ADD_ITEM_LIST, todoItem); console.log('state===', state); }, 1000); }, }, modules: { }, });
注意我们这里仍然使用常量来作
actions和mutations的方法名,使用时候要加上[].
在选项式API中使用
<template>
  <div class="about">
    <div>{{counter}}</div>
    <button @click="handleClick">按钮</button>
    <div>
     <div>
       <TodoItem :itemList="$store.state.itemList"/>
     </div>
      <div>
        完成的Todo
       <TodoItem :itemList="$store.getters.doneItemList"/>
     </div>
     <div class="btn-content">
       <button @click="addClick">增加Item</button>
       <button @click="reduceClick">减少Item</button>
       <button @click="changeClickAsync">调用Action</button>
     </div>
    </div>
  </div>
</template>

<script>
import TodoItem from '../components/TodoItem.vue';
import {
  ADD_ITEM_LIST, REDUCE_ITEM_LIST, CHANGE_ITEM_LIST_ASYNC,
} from '../store/constants';

export default {
  name: 'About',
  components: {
    TodoItem,
  },
  data() {
    return {
      counter: 0,
    };
  },
  computed: {
    todos() {
      return this.$store.getters.doneItemList;
    },
  },
  methods: {
    handleClick() {
      console.log('handleClick--->');
      this.counter += 1;
    },
    addClick() {
      const item = { text: 'add_item_list success!', done: true };
      /// 提交mutations
      this.$store.commit(ADD_ITEM_LIST, item);
    },
    reduceClick() {
      this.$store.commit(REDUCE_ITEM_LIST);
    },
    changeClickAsync()
      const item = { text: 'async_add_item_list success!', done: true };
      ///派发actions
      this.$store.dispatch(CHANGE_ITEM_LIST_ASYNC, item);
    },
  },
};
</script>
在组合式API中使用
在组合式API中通过调用
useStore函数,来在setup钩子函数中访问 store。这与在组件中使用选项式 API 访问this.$store是等效的.import { useStore } from 'vuex' import { computed } from 'vue' export default { setup () { const store = useStore() return { // 在 computed 函数中访问 state count: computed(() => store.state.count), // 在 computed 函数中访问 getter double: computed(() => store.getters.double) // 使用 mutation increment: () => store.commit('increment'), // 使用 action asyncIncrement: () => store.dispatch('asyncIncrement') } } }
三. 总结
通过对比React Redux与Vuex可以发现,两者的封装与使用有很大的相似性,它们都借鉴了 Flux的设计思想,通过使用对比可以让我们更容易掌握他们。
一些参考: